



How to arrange a decorative pond near a private house in Ukraine
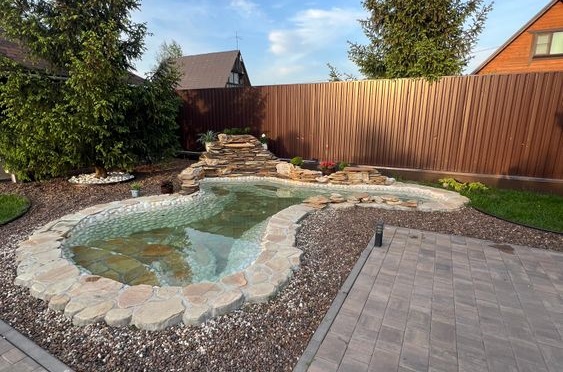
An artificial pond on your own plot is not only aesthetic, but also a salvation from the summer heat, which in recent years has become increasingly unbearable in Ukraine. And creating a pond with your own hands is a very real task. The main thing is to strictly adhere to the technology, take into account the peculiarities of our soils and choose the right materials.
In this article, we will analyze the step-by-step process of creating such a pond using a special ProElast membrane made of synthetic rubber or construction PVC film.
What will be needed?
Before you start working, prepare a complete set of everything you need. You can purchase the basic materials from us.
Required materials:
1. Waterproofing (base of the pond): ProElast EPDM membrane is the best choice for Ukraine (lasts up to 50 years, is not afraid of frosts -40°C and heat). A more budget option is PVC film (lasts 10-15 years).
2. Fibertex geotextile: a dense fabric (from 200-300 g/m²) that will protect the film from tree roots, rodents, and sharp stones.
3. Natural stone: granite, quartzite, large river pebbles, boulders (to mask the edges of the film and decor). Tip: avoid limestone and sandstone, they crumble from water and change its acidity.
4. Geogrid: for shoreline reinforcement.
5. Equipment: biofilter for water purification, UV sterilizer (prevents water bloom) and hoses.
1. Bayonet and shovel shovels.
2. Building level (preferably 1.5 meters long) or laser level.
3. Cord and stakes for marking.
4. Roulette.
5. Garden hose for filling with water.
What is the construction algorithm?
Stage 1: Design and location selection
For the conditions of Ukraine (especially the southern, central and eastern regions), the correct location is critically important:
Sun: The pond should receive direct sunlight for no more than 5-6 hours a day. Excessive sun in July-August will turn the pond into a «green soup.»
Shade: Don’t dig a pond close to old trees (oak, walnut, ash). Their roots will break through any waterproofing, and falling leaves will rot in the water.
Depth: if you plan to winter fish, the depth of the pond at its deepest point should be at least 1.5–1.8 meters — this is below the freezing level of the soil in Ukraine.
Outline the contours of the future pond.
Start digging the pit from the edges to the center.
Form the pond with terraces (steps). The width of the terraces is 30-40 cm. The first terrace (shallow water) is at a depth of 30 cm, the second is at a depth of 70-80 cm, then there is a wintering pit. Make the terrace slopes at an angle of 45° so that the soil does not crumble.
Constantly check the opposite banks with a level. They should be exactly at the same height.
Clean the pit thoroughly: remove all roots, sharp stones, and glass.
Pour a layer of sand 5-10 cm thick on the bottom and terraces. Tamp it down.
Cover the entire area of the pit with geotextile with an overlap of at least 50 cm. Lay the strips of geotextile with an overlap of 15 cm on top of each other.
Carefully spread the film over the pit. Do not pull it tight! It should freely follow all the bends and terraces.
Leave a film margin of at least 50-60 cm along the edges of the banks for reliable fixation in the soil.
Start pouring water from the hose under slight pressure.
As the pond fills, the film will straighten and settle under the weight of the water. Smooth out large folds yourself.
Fill the pond completely with water and leave it for 24-48 hours. The film should finally take its shape. Only then can you trim the excess edges on the banks.
Dig a small trench (15-20 cm deep) around the pond. Place the edge of the film there, cover it with gravel or soil and tamp it down. This will protect the pond from being washed away by rainwater.
Line the shoreline with flat stones or large boulders so that they completely cover the membrane.
Install the pump on the bottom (preferably on a slight elevation, such as a flat stone, so that it does not suck in silt) and connect it to the filter.
To create a balanced ecosystem — plant herbs.
Your own pond is a live organism. The first 2-3 weeks after filling, the water may become cloudy and green — this is a normal process of forming a biobalance. As soon as the filter starts working and the plants start growing, the water will become transparent, giving you the coolness, peace and natural harmony you dream of.
If you choose a more complex method by creating a concrete tank, do not forget that waterproofing work on the concrete tank must be done on both sides. For this, Izoplast R bitumen primer and Izoplast B rubber mastic are suitable.
Frequently asked questions
How to arrange a decorative pond near a private house in Ukraine?
Before you start working, prepare a complete set of everything you need. You can purchase the basic materials from us.
